How to Deploy an Avalanche Node: Manual Node Setup

Setting up an Avalanche node is pretty simple. Whether you're a beginner or an experienced user, this article will provide you with step-by-step instructions to deploy your own Avalanche node.
What is an Avalanche Node?
An Avalanche node is a computer that runs the Avalanche software (AvalancheGo) to support transactional validity and network security. A node on Avalanche is commonly specified as:
- Validator: These are nodes responsible for validating transactions on the Avalanche network. In addition, they stake AVAX tokens and earn rewards.
- Non-validator: These nodes are tasked with providing API. Unlike validators, non-validator nodes don't participate in consensus and thus intentionally generate no staking reward.
Both Avalanche validators and non-validators need to store a copy of the chain and stay updated with the network's state. So whether you want to run a validator node or a non-validator node will depend on your interest.
What is an API server?
An API server is a software interface that allows developers to interact with a blockchain network. API servers can be used to build a variety of blockchain applications, such as block explorers, wallets, or DApps.
Avalanche Node Setup Requirements
Here is a breakdown of Avalanche node setup requirements.
Computer Hardware and OS:
- CPU: Equivalent of 8 AWS vCPU
- RAM: 16 GiB
- Storage: 1 TiB SSD
- OS: Ubuntu 20.04 or MacOS >= 12
- CAUTION: Do not try running a node on an HDD.
Networking:
- Network environment: Connections from the Internet on port 9651.
- If you are running a node on a cloud provider, you will have a static IP.
- If you are running a node on a home connection, you will need to set up port forwarding on your router.
- DANGER: A fully connected Avalanche node maintains and communicates over a couple of thousand live TCP connections. This may be too much for some low-powered or older home routers.
What is a static IP?
A static IP is an IP address assigned to a device on a network that is unlikely to change over time. Static IP addresses make it easier for other devices to find and connect to your server.
What is a dynamic IP?
Dynamic IP addresses change from time to time. They are easier to manage compared to static IP and can save on IP address space.
How to Deploy an Avalanche Node: Manual Node Setup
Our guide to deploying an Avalanche node will focus on running an Avalanche node manually. If you want to become a validator, you need to go through the same process and then add your node as a validator.
Step 1: Download AvalancheGo
The node is a binary program. You can either download the source code and then build the binary program, or you can download the pre-built binary.
If you want a quick and easy setup to run your own node and stake, we recommend downloading the pre-built binary.
For developers looking to experiment and build on Avalanche, we recommend building the node from the source.
Source Code
Install Go 1.19.6 using this guide. Then set $GOPATH environment variable and download the AvalancheGo repository into your $GOPATH:
cd $GOPATH
mkdir -p src/github.com/ava-labs
cd src/github.com/ava-labsgit clone https://github.com/ava-labs/avalanchego.
gitcd avalanchego
INFO
You can clone the repository using either HTTPS or SSH:
git clone git@github.com:ava-labs/avalanchego.git
Learn how to use SSH here.
Note: By default, the repository clones the master branch. For the latest stable version, check out the latest tag.
Build AvalancheGo
./scripts/build.shOnce built, the binary named avalanchegowill be located in avalanchego/builddirectory within your $GOPATH at $GOPATH/src/github.com/ava-labs/avalanchego/build.
To start running AvalancheGo, simply execute the following command:
./build/avalanchegoBinary
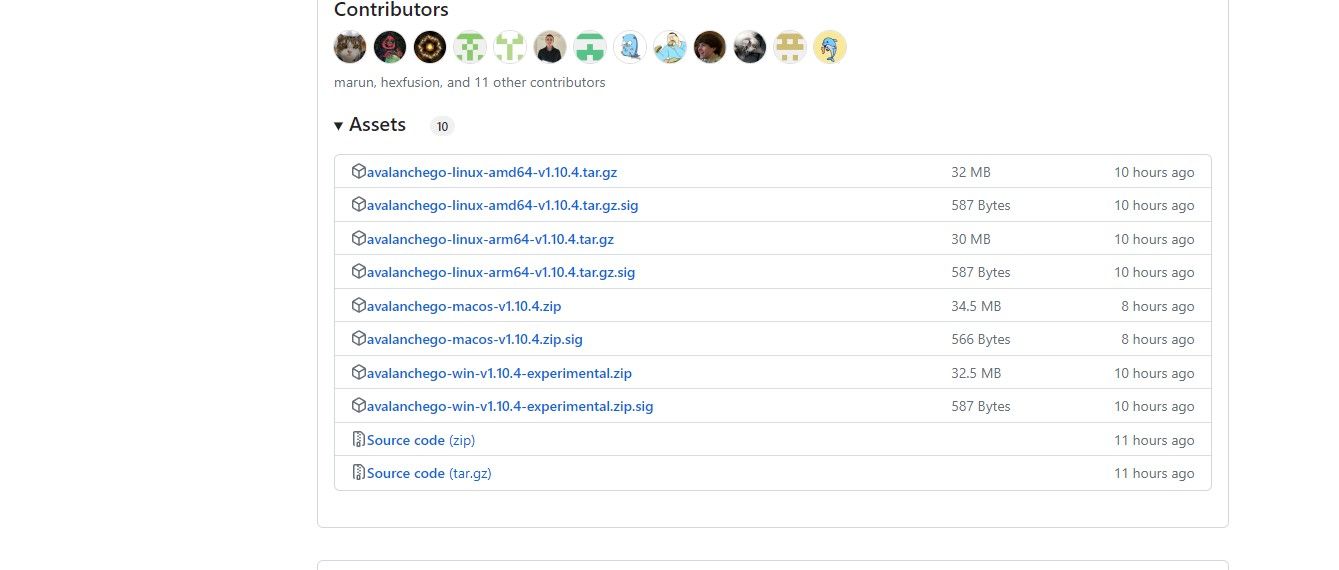
If you prefer a pre-built binary, visit the releases page and choose the latest release.

Under Assets, select the appropriate file.
- For MacOS users: Download:
avalanchego-macos-<VERSION>.zipUnzip:unzip avalanchego-macos-<VERSION>.zipThe resulting folder,avalanchego-<VERSION>, contains the binaries. - For Linux users: Download:
avalanchego-linux-amd64-<VERSION>.tar.gzUnzip:tar -xvf avalanchego-linux-amd64-<VERSION>.tar.gzThe resulting folder,avalanchego-<VERSION>-linux, contains the binaries. - For Linux on Arm64-based computers: Download:
avalanchego-linux-arm64-<VERSION>.tar.gzUnzip:tar -xvf avalanchego-linux-arm64-<VERSION>.tar.gzThe resulting folder,avalanchego-<VERSION>-linux, contains the binaries.
Step 2: Start a Node and Connect to Avalanche
To start a node, execute the appropriate command based on your setup:
- You built from source:
./build/avalanchego- You use the pre-built binaries on MacOS:
./avalanchego-<VERSION>/build/avalanchego- You use the pre-built binaries on Linux:
./avalanchego-<VERSION>-linux/avalanchegoBy default, the node will connect to the Mainnet. To connect to the Fuji Testnet, read this.
Once the node starts, it will bootstrap and catch up with the network.
[09-09|17:01:45.295] INFO <C Chain> snowman/transitive.go:392 consensus starting {"lastAcceptedBlock": "2qaFwDJtmCCbMKP4jRpJwH8EFws82Q2yC1HhWgAiy3tGrpGFeb"}[09-09|17:01:46.199] INFO <P Chain> snowman/transitive.go:392 consensus starting {"lastAcceptedBlock": "2ofmPJuWZbdroCPEMv6aHGvZ45oa8SBp2reEm9gNxvFjnfSGFP"}[09-09|17:01:51.628] INFO <X Chain> snowman/transitive.go:334 consensus starting {"lenFrontier": 1}You can check the bootstrapping status using the provided command:
curl -X POST --data '{ "jsonrpc":"2.0", "id" :1, "method" :"info.isBootstrapped", "params": { "chain":"X" }}' -H 'content-type:application/json;' 127.0.0.1:9650/ext/infoIf the response from the command is true, it indicates that the chain has finished bootstrapping. Otherwise, it will return false. If you attempt to make API calls to a chain that is still bootstrapping, the API calls will be rejected with the message API call rejected because chain is not done bootstrapping. If you encounter any issues, contact Avalanche Discord.
To stop the node, simply press Ctrl + C.
To enable API calls to your node from other machines, include the argument--http-host= (for example ./build/avalanchego --http-host=)
Connect to Fuji Testnet
To connect to the Fuji Testnet instead of the Mainnet, use the argument --network-id=fuji.
Your node is now up and running, connected to the network. If you wish to use your node as a validator on the mainnet, check out how to add your node as a validator using Avalanche's native wallet.
In addition to running an Avalanche node, you can delegate your AVAX to a validator and earn rewards. Staking AVAX with validators is a good choice to support the network's security without the need for technical proficiency.


