How To Deploy A Graph Node

Running a Graph node is a great way to support the decentralization of the network and earn GRT tokens. If you have a good internet connection and server, you can set up a Graph node to index subgraphs and serve data to other users.
In this article, we'll go through all the requirements for node deployment and the steps to set up a node on the Graph network.
What is a Graph Node?
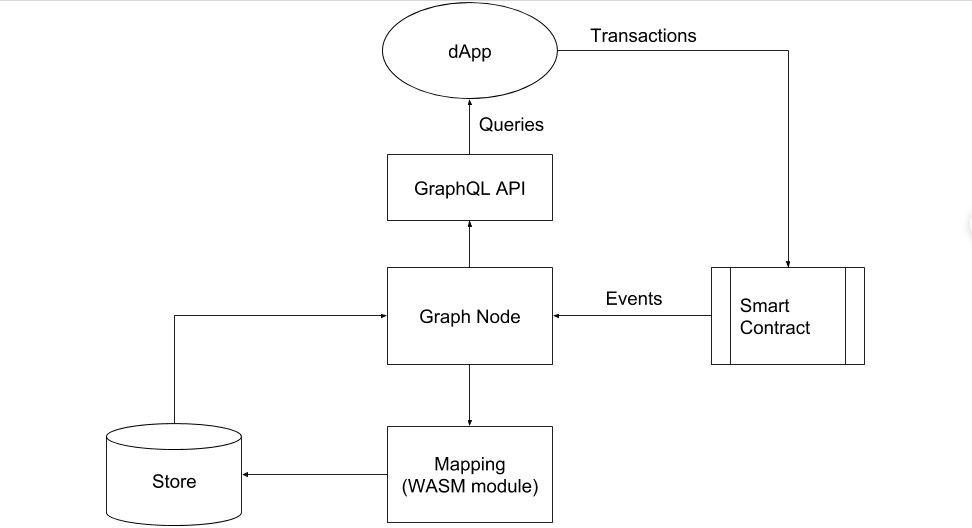
A Graph node operator, mainly known as an indexer, is a piece of software in charge of indexing the data from subgraphs. The indexed data can later be queried by dApps and other users.
In detail, The Graph indexers take data from the Ethereum blockchain and store it in a way that can be easily queried using GraphQL. Developers can use the data to build applications.
'Graph Node can be built from source, or indexers can use one of the provided Docker Images.'
Graph Node Requirements
Interested participants need to consider the following prerequisites to build a Graph node.
Minimum hardware requirements
To build a Graph node with cargo, ensure you have at least 8GB of RAM.
Prerequisites
- Rust Installation: Install Rust by following the instructions on How to install Rust.
- PostgreSQL: Download and install PostgreSQL from PostgreSQL Downloads.
- IPFS: Install IPFS by following the instructions on How to install IPFS.
- Protobuf Compiler: Install the Protobuf Compiler as per the instructions for your system.
- Ethereum Node: You can run your Ethereum node or use an Ethereum node provider.

How to Set up a Local Graph Node
We recommend that you regularly check out The Graph GitHub for the latest updates.
Step 1: Install prerequisites
You can follow the links above to install prerequisites.
Step 2: Set up your node
- Initialize IPFS:
ipfs init
ipfs daemon- Initialize PostgreSQL:
initdb -D .postgres
pg_ctl -D .postgres -l logfile start
createdb graph-node
If you are using Ubuntu, you may need to install additional packages:
sudo apt-get install -y clang libpq-dev libssl-dev pkg-config- Clone the example-subgraph repository and install dependencies:
git clone https://github.com/graphprotocol/example-subgraph
cd example-subgraph
yarn
yarn codegen- Clone the graph-node repository :
git clone https://github.com/graphprotocol/graph-node
cd graph-node
cargo build
Step 3: Run your node
- Once you have all the dependencies set up, you can run the following command to start the Graph Node:
cargo run -p graph-node --release -- \
  --postgres-url postgresql://USERNAME[:PASSWORD]@localhost:5432/graph-node \
 --ethereum-rpc NETWORK_NAME:[CAPABILITIES]:URL \
 --ipfs 127.0.0.1:5001
Replace USERNAME and PASSWORD with your PostgreSQL username and password. Refer to the Postgres documentation for more details on setting the connection string.
- To enable Postgres extensions (if needed), use the following commands, which
<SUPERUSER>should be replaced with your superuser and<USERNAME>should be replaced with your PostgreSQL username. This will also spin up a GraphiQL interface at http://127.0.0.1:8000/.
psql -q -X -U  graph-node <create extension pg_trgm;
create extension pg_stat_statements;
create extension btree_gist;
create extension postgres_fdw;
grant usage on foreign data wrapper postgres_fdw to ;
EOF - To get the subgraph working locally, run:
cd example-subgraph
yarn create-local- Deploy the subgraph to the Graph Node:
yarn deploy-localNow that you've set up a local Graph node, you can also stake The Graph. Follow this guide to get started and earn 11% APR staking rewards.


