How to Deploy a Celestia Node: Run a Light Node and Full Node

Celestia ($TIA) has hyped the crypto community in recent weeks with its foundational concept of modular data availability and groundbreaking features. There are numerous ways to participate in the network, such as staking TIA with validators or building applications on top of the network.
Users can also interact with the blockchain by deploying a node. This guide will explain how to set up and run a Celestia node. Running a node helps secure the Celestia network and your assets, as well as earn incentives.
What is a Celestia Node?
A Celestia node is a piece of software that runs on a device and is connected to the Celestia blockchain. Its primary functions include maintaining, verifying, and securing the Celestia network.
Each type of node comes with a specific set of functions and requirements. The types of nodes that you can run on Celestia are as follows:
Consensus nodes:
- Full consensus node: Full consensus nodes store a complete copy of the blockchain history and are connected to the consensus network. They help confirm and verify blocks and data.
- Validator node: Validator nodes produce and vote on the blocks. They help maintain the overall performance and secure the network.
Data availability nodes:
- Full storage node: Full storage nodes only store the blockchain data without being connected to the consensus network.
- Bridge node: Bridge nodes bridge blocks between the data availability network and the consensus network. Their task is to ensure that data is available across both networks.
- Light node: Light nodes on Celestia use data availability sampling to verify the chain without downloading the entire blockchain. This makes them less resource-intensive and more accessible to run, allowing more people to participate in securing the network.
By running a node, you're actively participating in the Celestia blockchain network.
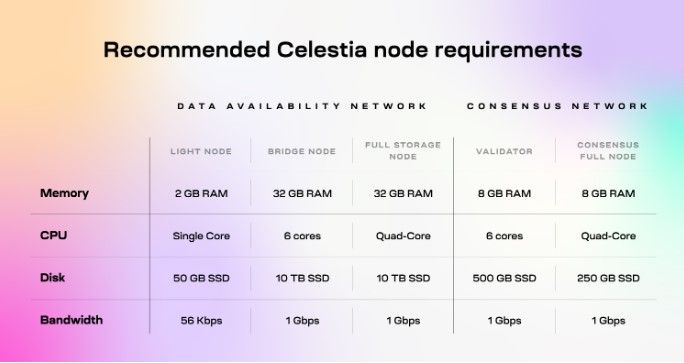
Celestia Node Setup Requirements
The following photo specifies requirements to set up a Celestia node:
How to Deploy a Celestia Node: Set up and Run a Node on Celestia
Below are instructions to set up and run a node on Celestia (light nodes and full storage nodes). For the latest updates, please regularly check out the Celestia Docs. To get further support, you can join the Celestia community.
Step 1: Choose a node type
Running a light node on Celestia is a great way for beginners to start participating in the network, as it requires fewer resources and less technical expertise. You can level up with the consensus node, but you're required to run a bridge node if you want to set up a consensus node.
Step 2: Set up the environment
- Install dependencies
It's recommended to run Ubuntu on a virtual machine. Check out this guide if you are looking to install Ubuntu in Virtual Box.
- Once you complete installing Ubuntu, make sure that your system is up-to-date. Update your system by running the following commands:
sudo apt update && sudo apt upgrade -y
- Install packages:
sudo apt install curl tar wget clang pkg-config libssl-dev jq build-essential \
git make ncdu -y
- Install Golang
The Celestia node is implemented in Golang. So the next step is to install Golang.
- Set up the network (Mainnet beta/Mocha/Arabica):
ver="1.21.1"
- Download and install Golang:
cd $HOME
wget "https://golang.org/dl/go$ver.linux-amd64.tar.gz"
sudo rm -rf /usr/local/go
sudo tar -C /usr/local -xzf "go$ver.linux-amd64.tar.gz"
rm "go$ver.linux-amd64.tar.gz"
Ubuntu (ARM): cd $HOME
wget "https://golang.org/dl/go$ver.linux-arm64.tar.gz"
sudo rm -rf /usr/local/go
sudo tar -C /usr/local -xzf "go$ver.linux-arm64.tar.gz"
rm "go$ver.linux-arm64.tar.gz"
- Add directory:
echo "export PATH=$PATH:/usr/local/go/bin:$HOME/go/bin" >> $HOME/.bash_profile
source $HOME/.bash_profile- Check Golang version:
go versionStep 3: Install Celestia node
- Clone repository:
cd $HOME
rm -rf celestia-node
git clone https://github.com/celestiaorg/celestia-node.git
cd celestia-node/- Check the version (Mainnet beta/Mocha/Arabica):
git checkout tags/v0.12.0- Install binary:
make build
make install- Buil
cel-keyutility:
make cel-key- Verify and check the binary:
celestia versionStep 4: Run a Celestia light node
- Initialize your node:
It's recommended to run a light node on Arabica. Start by running this command:
celestia light init --p2p.network arabicaYou can also run a light node on Mainnet Beta:
celestia light initor Mocha testnet:
celestia light init --p2p.network mocha- Start you node:
Start your node by connecting to a validator node's gRPC endpoint. Check out this guide to make sure you open the right port.
Start your light node by running this command:
celestia light start --core.ip <URI> --p2p.network <network>Replace URI with an RPC and choose the network. Check out the list on the Mocha testnet page or list on the Arabica devnet page.
- Create keys and wallets for your node:
- Create a key by running the following command in celestia node directory:
./cel-key add <key-name> --keyring-backend test \
--node.type light --p2p.network <network>- Start your node with your created key:
On Mainnet Beta:
celestia light start --keyring.accname my_celes_key \
    --core.ip consensus.lunaroasis.net
On Arabica:
celestia light start --keyring.accname my_celes_key
--core.ip consensus-validator.celestia-arabica-10.com
--p2p.network arabica
On Mocha:
celestia light start --keyring.accname my_celes_key \
    --core.ip rpc-mocha.pops.one --p2p.network mocha
Once you starte your node, your wallet is also created. You need to top up your wallet with testnet tokens to pay for PayForBlob transactions.
You can get your account address by using RPC CLI or running the following commands:
./cel-key list --nostartde.type light --keyring-backend test
--p2p.network
Request funds to your address by running this command on Celestia Discord:
$request <CELESTIA-ADDRESS>To run a light node with a custom key, check out this section. For data availability sampling, you can read this node tutorial.
Step 5: Run a Celestia full storage node
- Initialize your node:
On Mainnet Beta:
celestia full initOn Mocha:
celestia full init --p2p.network mochaOn Arabica:
celestia full init --p2p.network arabica- Start you node:
Start your node by connecting to a validator node's gRPC endpoint. Check out this guide to make sure you open the right port.
Start your light node by running this command:
celestia full start --core.ip <URI>Replace the URI with an RPC and choose the network. Check out the list on the Mocha testnet page or list on the Arabica devnet page.
Now, you've successfully set up your node on Celestia. Apart from running a node, you can delegate your $TIA to participate in the network's activities and receive passive income. Learn how to stake $TIA and earn handsome staking rewards through our Celestia staking guide.


